Green Green and more Green

Green Green and more Green

Thursday, February 20, 2014

My "File Folder"

I was cleaning out my purse-- I had an abundant accumulation of papers. I threw some away, but most I needed to keep for one reason or another. But it was making my wallet a mess. So I decided to make a tiny book of "file folders" so I could organize all of it and hopefully find it when needed!

I started with kraft paper that I cut into "files" with Tim Holtz's On the Edge file die.
I folded each page in half to make a pocket. Then I made a binding (the 1/2" , 1/4" ,1/4" type- score, fold and tape the middle section of each piece to itself to make a "flap") and adhered each pocket to a flap of the binding making sure the file tabs went every other direction. 
Here is a close-up of the binding with a small piece of kraft paper wrapped from front to back to cover the binding and help the book to fold closed and not be so "puffy".


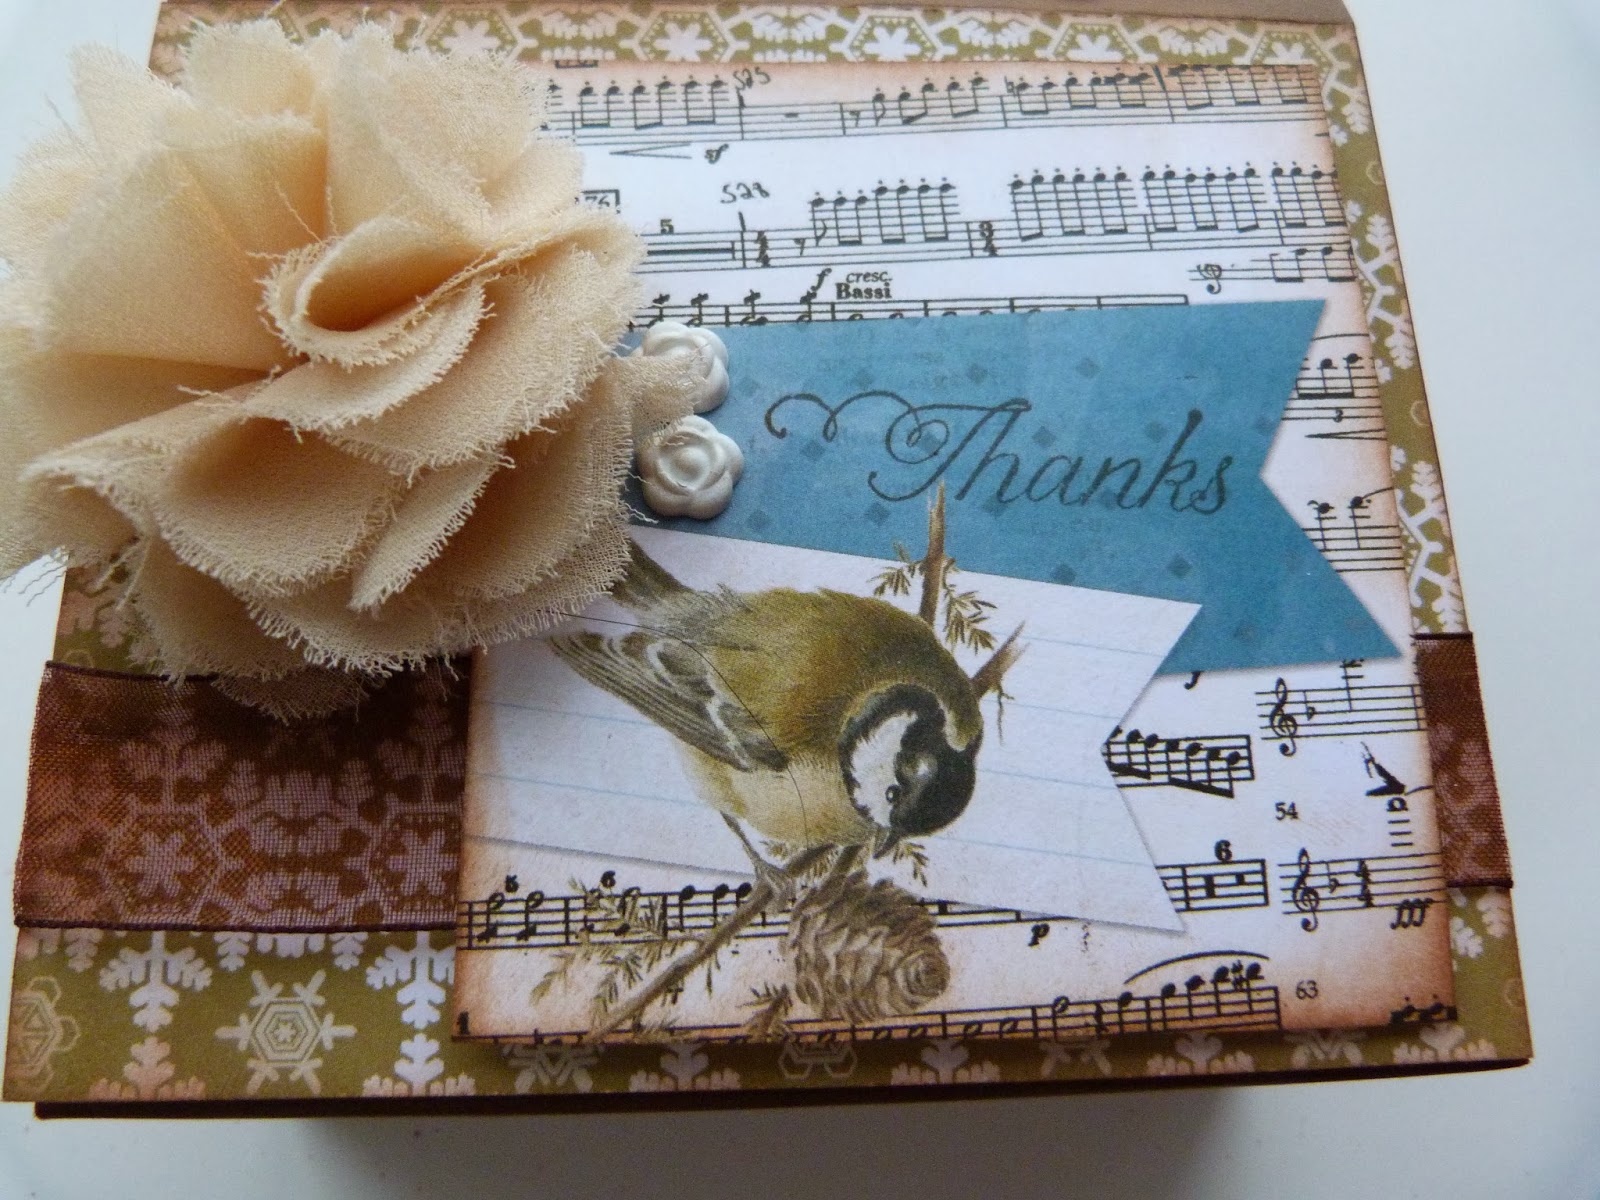
Then I decorated the front and each page inside with a piece of Graphic 45 paper (Twelve Days of Christmas actually! I love the roses!) Then I wrote what I wanted in each pocket on the tabs.


I decided to put my hand here to give some perspective. It looked big in the picture, but as you can see it's not! I have a large purse but this will easily fit in some of my smaller purses. If I were to do it again, I would make it slightly deeper and longer- but not much. I didn't want it to be too big, but a few papers I had to fold twice to fit. 

Taaa Daaa!

Tuesday, February 18, 2014

Gift Bags

I found this bag-folding-site on Pinterest and wanted to try it. It's all folding --no cutting. I used plain brown cardstock and folded, added plain grosgrain ribbon handles and decorated with the BoBunny paper from The Scrapbooking Studio.

This first one is my favorite. Everything shown is BoBunny paper except for the flowers and ribbon! I made the green background and used the music/washi tape/bird journaling tag as is. I just popped it up and added a stamp. The flowers were ones I had laying around and matched perfectly. I put a wider brown ribbon under the journaling tag. (There are Hershey's Kisses inside!)


This one I messed with a bit but ended up liking the final product. The fox is fussy cut from a journaling tag. (The fox is ON the tag).  I cut a border off another paper to add the blue underneath the journaling tag. I added a brown velvet ribbon and a snowflake button that came with the embellishments. I tied some fuzzy white string in the button. The flower brad I have had forever... (not sure where from!)


This is another journaling tag fussy cut around the blue. The deer was so lovely I just added an inked Prima flower and a music button that came with the embelllishments. The swag with Simple Saying on it was also cut from a tag. I added brown pleated ribbon beneath it all to finish it off. 
Everything shown came from The Scrapbooking Studio.


Monday, February 17, 2014

BoBunny Cards

These are the cards I made with the BoBunny paper from The Scrapbooking Studio for the next design team project. I used a journaling tag, a cut-out "washi tape" flag and a piece of paper with birch trees that I thought were beautiful all by itself. 
The first card: the center piece is cut from a journaling tag. The snowflakes and star are a sticker from the embellishments. I just added an enamel dot to the star a piece of brown burlap. I then stamped with a Tim Holtz's Simple Sayings stamp.
I just cut the piece and used my Chomper to "deco" the edges. I then used Tim Holtz's Simple Sayings to stamp on the front. I added a white enamel dot and left it like that! I thought the paper was so beautiful, I didn't want to add any more and distract from the paper! 

The last card just "happened" with a leftover blue cardstock scrap. I had already cut out the banner to use on a layout and it didn't quite work. It fit perfectly on the scrap and I just added a Simple Saying and a button embellishment that came with the paper. I didn't adhere the edges of the banner to make it appear as if it was sticking out and two seperate pieces (but it is all one!).
 Sometimes small is better!

Saturday, February 15, 2014

My Snowman


This is my next design team project for The Scrapbooking Studio. I used all BoBunny products: paper and embellishments. The paper lace I cut from Tim Holtz's Lace Die Cut, the lettering is Tim's Typeset and the flower is Tattered Flowers Die with the BoBunny paper. 

It is a picture of me from about 1970! I don't remember it, but it looks cute! :) The colors worked well with this paper. I just started layering starting with the picture and the pinecone journaling piece. I really liked it. I cut out all the "washi tape" banners from the papers and added those. The banner is also cut from a paper. 

The colors are a little dark in this picture. Come to the store and see it in "real life" to see the beautiful blues, browns and whites in this paper. It's lovely!

Thursday, February 13, 2014

The Definition of Love

I hope you may know this kind of love someday.......


 Love is patient, love is kind. It does not envy, it does not boast, it is not proud.  It is not rude, it is not self-seeking, it is not easily angered, it keeps no record of wrongs.  Love does not delight in evil but rejoices with the truth.  It always protects, always trusts, always hopes, always perseveres.  Love never fails

1 Corinthians 13:4-8


Happy Valentine's Day!

Valentine Banner

I made this banner out of red, white, black cardstock and scraps of random Valentine paper from multiple companies. Some of the embellishments are just cut from paper, but the cupid and kissing couple I cut from my Slice machine. I strung it all on a pink ribbon. This is hanging on my fireplace. I love it!


Wednesday, February 12, 2014

More Valentine Ideas!

Tags for my girls!
Tags from Tim Holtz's Tag and Tie
Inked in Spun Sugar and Fired Brick
Embossed in Tim's Embossing Folder - swirly
Stamped with Tim's Valentine stamps: Cupid, Heart, To My Valentine all in Fired Brick and embossed.
I inked the edges in Vinrage Photo Distress Ink.
I inked the seam binding ribbon in Spun Sugar and Vintage Photo.
I added some Tim Holtz Baubles, tulle, and a die cut key.


I also put a small easel on the back of this one so my daughter could stand it up. This is Tim Holtz's Small Easel Die Cut. It's really handy!
The bottom one has a strip of Antique Lace Tim Holtz's Die Cut.


Tuesday, February 11, 2014

Valentine Decor


I made this tag and it is sitting in my kitchen. I used Authentique Valentine Paper that I got at The Scrapbooking Studio. I added some tissue tape and a small resin rose. A plain white seam binding ribbon finished it off! The edge of the cupid you can see at the bottom is actually on another tag. 

Monday, February 10, 2014

Boy Valentine


Here is another Boy Valentine. This one I made for my son. 


We have a Scottie-Lucy- who is technically "his" dog (but she really is a momma's girl!). So I had to use my Sizzix Scottie Die I just got from The Scrapbooking Studio. I cut it from black paper and then embossed TIm Holtz's Valentine Stamp with Ranger white opaque embossing powder. 
I used Tim Holtz's Distress Stain in Weathered Wood and Vintage Photo on the #10 Manila Tag. I tore the bottom off and added a piece of white die cut Vintage Lace (Tim Holtz's) across the bottom. I popped up the Scottie on that. I stamped the Valentine Ticket in Vintage Photo. I stamped the Cupid (both stamps from Tim Holtz's Valentine Stamp set) on white paper in Fired Brick. I inked over it with Vintage Photo, cut it out and popped it up. I also stamped "I love you" on the bottom in vintage Photo. That stamp is from Tim Holtz's Simple Sayings Stamp set. Turned out nice! Valentine-y (is that a word???) and yet boyish!

Sunday, February 9, 2014

Manly Valentine

I needed to make a Manly Valentine for a VERY creative family friend. He is an artist and super creative- so I pulled out all the stops. I really like how it turned out!

I started with a tag I die cut from Tim Holtz's Tag and Die. I inked it Fired Brick-- but you can't really see that anymore anyway!! :)


Then I started piling stuff on! I got the idea for the gear head guy because my friend does a lot of drawings with people who have "interesting" heads. So I used one of Tim Holtz's people pictures from his paper stash and cut gears from the Movers & Shakers die. I cut a piece of paper lace and embossed it with some random "verdigris" embossing powder I got from someone. It turned out awesome, but you can only see the tip of it at the bottom! It goes the length of the card!
I also cut a 14, ruler paper and clock from Tim's paper stash and stamped a ticket from Tim's Ticket stamp set.  I put Glossy Accents on the clock- but kind of "messy" and then inked it when it was dry so it looked "used". I used a metal tag and banged it up. I had a heart cut out and embossed it with Tim's Valentine embossing card. I put Glossy Accents on that and then "broke" it and inked it when that was dry.


Then I started layering! I also added a torn piece of twill behind the metal tag and an extra gear tucked under the picture. I inked some seam binding in Fired Brick and Vintage Photo and added a trinket to it. I attached the 14 with a binder clip.

I got everything for this project from The Scrapbooking Studio.

Saturday, February 8, 2014

Valentine Tags


These are the tags I made to give out for Valentine's Day. I stained the tags using Tim Holtz Distress Stain that I got from The Scrapbooking Studio.  I used a mix of Spun Sugar and Fired Brick. Then I used Tim Holtz Distress Ink in Vintage Photo on the edges.

 I used these same colors randomly on the seam binding ribbons too.

Then I stamped I love you (Tim Holtz Simple Sayings Stamp) in Vintage Photo. I stamped To My Valentine from Tim's Valentine set in Fired Brick and embossed with Tim's clear embossing powder.

I also stamped the cupid on white paper in Fired Brick, embossed and then inked with Vintage Photo. 

These will go to few family members! Don't tell!


Thursday, February 6, 2014

Halloween ATCs!

So much fun to make! I used all of the Teresa Collins Masquerade Halloween paper.
 I also used Tim Holtz distress paper for the solid colored pieces. (tree, owl, witch's legs, fence)


I obviously made these a long time ago, but just noticed that I never posted it!!

I made the owl, tree, fence, spider and witch's legs with my Slice machine.


Wednesday, February 5, 2014

Valentine Decor Class


Class is this Saturday at 2:00 pm. A few spots are left! Hope to see you there!

Tuesday, February 4, 2014

Another Tag


Another fun tag I was playing with.All products from The Scrapbooking Studio.

 I used the Crackle Stencil and Antique Linen Distress Ink to make the background. I stamped the birds in Faded Jeans- and embossed them. I stamped the  mirror and ballerina in Tattered Rose and embossed the ballerina. I stamped the man in Black Soot Distress Ink. I stamped the merry-go-round in Peeled Paint and embossed that too.


I just wanted to play with the stamps and stencils-- fun!

Sunday, February 2, 2014

Booklets Postponed

The cute little Make-n-Take booklets I posted the other day have been postponed. I will let you know when I will be doing them at The Scrapbooking Studio!

Tags for Fun

I got some older Tim Holtz stamps for Christmas. I wanted to play around with them-- and this is what I got!

All products are from The Scrapbooking Studio.

On the first tag, I used the Birch Stencil and Antique Linen Distress Ink to make the background. Then I stamped the map stamp in Brushed Corduroy. I also edged the tag in Brushed Corduroy. Then I stamped the globe in Faded Jeans Distress Ink. I embossed it in clear Distress Embossing Powder. I think I am going to use something like this for some birthday cards for men.


I love love love elephants! I used the Burlap Stencil and Antique Linen Distress Ink for the background. I stamped the elephants in Brushed Corduroy. I embossed every other elephant-- kind of hard to see in this picture. Then I had some brown twill I used for the ribbon.


So cute! I have this standing up on my worktable so I can see it!